
How to Fill the Back Seat Footwell for a Dog: Platforms, Boxes and DIY Fixes
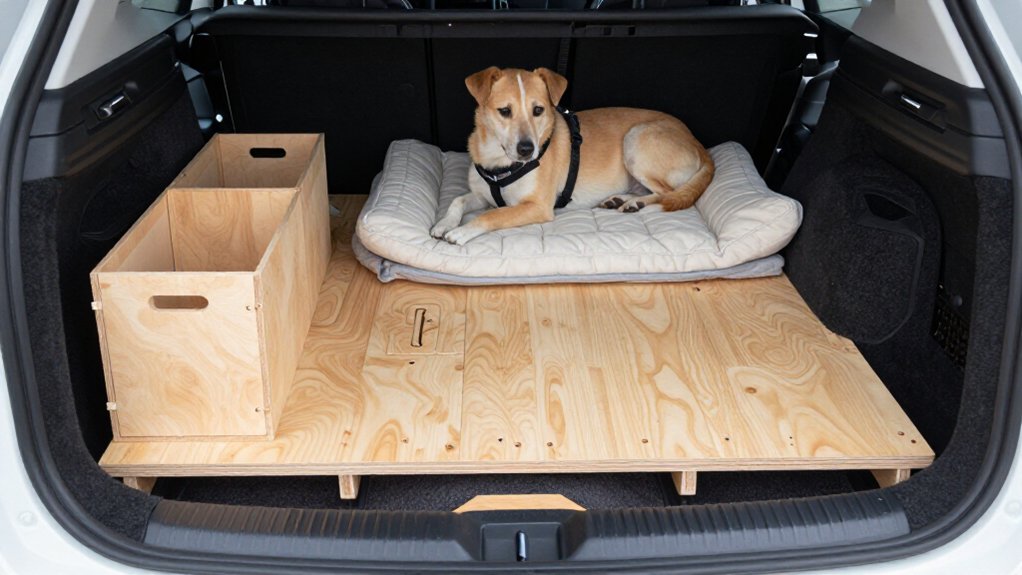
You can level your dog’s back-seat area by measuring the footwell, laying a nonslip rubber mat, and filling the space with upright crates, dense foam, or a rigid floor-supported extender.
Top it with a sealed plywood bridge panel that sits level with the bench, padded edges included. Keep rails, buckles, wiring, vents, and seat travel clear. Load-test it with 40 pounds and gentle braking.
The steps below help you secure it and inspect ties safely.
Easy: Level Platform, 30-Min
For a quick 30-minute setup, fill the footwell with firm, high-density foam blocks or a ready-made rigid extender, then place a thin, padded bridge panel across the top so it sits level with the rear bench. Choose foam that won’t compress under your dog’s weight, and use a panel with a non-slip cover. Set every component on the vehicle floor so it carries the load, rather than hanging it from seat straps.
Secure the bridge with friction, upholstery-safe hook-and-loop tabs, or seatbelt pass-throughs that don’t block buckles. Keep it clear of seatbelt anchors, LATCH hardware, airbags, and front-seat travel. Press down firmly and check for wobble, gaps, or sliding before your dog rides. A washable cover limits mess and improves footing on turns too.
Measure Footwell Dimensions
Accurate measurements let you choose a footwell fill that fits securely without blocking seatbelts, LATCH anchors, airbags, front-seat movement, or door closures. Remove mats, set the rear seats as you’ll use them, park level, and record your vehicle’s year and configuration. Check tape accuracy first.
- Measure floor-level depth from the front-seat base to the rear seatback; note sloped areas at mid-height.
- Measure width between wheel wells at the narrowest floor point, then again a few inches higher.
- Measure floor-to-cushion clearance and, for tall boxes, top-to-headliner clearance.
- Measure the door or hatch opening, sill lip, center-console protrusions, and seatback angle.
Photograph reference points and make a cardboard template. Test it with seats moving fully and restraints accessible. Leave room for folding seats and secure installation.
Step 1: Vacuum Loose Dirt From Footwell
With the fit laid out, vacuum the bare footwell before installing any filler. Use a crevice tool along seat rails, carpet edges, and the center hump, where gravel and pet hair gather. Move the front seats only as far as their tracks allow, and keep the ignition off while you work. Check beneath the rear bench for loose items that could rattle or shift under a platform.
Don’t force the nozzle near wiring, seatbelt anchors, airbag connectors, or floor vents. If moisture or salt is present, blot it and let the area dry completely. A clean, dry footwell lets you inspect the carpet and floor for damage and ensures your chosen filler sits flat without concealing debris that may cause instability or odors later.
Step 2: Lay Down Nonslip Rubber Mat
Once the footwell is clean and dry, lay a thick nonslip rubber mat across the floor before setting in the filler. Choose a mat heavy enough to stay flat yet flexible enough to follow the center hump and contours. Trim it so it covers the floor without curling up the sides or blocking seatbelt anchors, LATCH points, vents, or wiring access.
Check that the mat doesn’t interfere with front-seat travel or rear seat operation. If it shifts when you press on it, use a vehicle-safe grippy backing or a mat; don’t use loose adhesive that may damage carpeting. Wipe away moisture and grit trapped underneath after trips.
The rubber adds traction, protects carpet, and helps keep a floor-supported filler from sliding under your dog.
Step 3: Bridge Footwell With Plywood Panel
Cut a plywood panel to span the rear-seat edge and the supported footwell filler, creating a level surface your dog can stand and turn on without dropping into the gap.
Measure the bench width, footwell depth, and seat height first; make a cardboard template to check contours, the center hump, and front-seat travel. Choose exterior-grade plywood thick enough to resist flexing under your dog’s weight, yet thin enough to sit flush. Round and sand every edge, then seal the wood against moisture and splinters.
Cover the top with nonslip material and secure the panel so it can’t slide or tip. Keep seatbelt buckles, LATCH anchors, airbags, and rear-seat releases accessible. Load-test it while parked before driving, and recheck after adjusting either front seat position.
Step 4: Place Milk Crates Under Panel
Milk crates can support the plywood panel in the footwell, creating a simple floor-supported base instead of putting your dog’s weight on seat straps. Choose sturdy, uncracked crates with flat tops, and position them upright so their strongest surfaces carry the load. Measure the footwell first; crates must sit fully on the vehicle floor without pressing against seat rails, wiring, vents, or the center console.
Use enough crates to support the panel across its width, especially where your dog stands or turns. Keep their height below or level with the rear cushion after accounting for panel thickness. Test the setup with weight while the car is parked. The panel shouldn’t rock, shift, bow, block seatbelt buckles, interfere with front-seat travel, or cover LATCH anchors.
Step 5: Pad Edges With Pool Noodles
Pad the exposed plywood-panel edges with slit pool noodles to create a soft bumper where your dog may step, lean, or slide during braking. Choose closed-cell noodles and cut a slit along each one so it grips the panel edge. Cover every exposed front, side, and corner edge within your dog’s reach, especially where the platform meets the rear bench.
Keep padding clear of seat-belt buckles, LATCH anchors, seat tracks, and any trim that moves when you adjust the front seats. Press the noodle into place, then test the setup by pushing the panel from several directions. It shouldn’t shift, lift, or pinch upholstery.
Replace noodles that tear, compress, or become slick with moisture. Before driving, check that your dog can stand and turn.
Step 6: Zip-Tie Crates, Trim Tails
Secure any stacked crates or modular supports to one another with heavy-duty zip ties so they can’t separate or tip into the footwell during braking or turns. Thread each tie through solid crate rails or predrilled holes, not around flimsy fabric panels or seat-belt hardware. Pull them tight enough to stop shifting, but don’t crush foam inserts or pinch upholstery.
Trim every excess tail flush with the locking head, then rotate the cut end away from your dog’s paws, coat, and the seat fabric. Check for sharp edges by running a gloved hand over each connection. Keep ties clear of buckles, LATCH anchors, airbag zones, wiring, and front-seat tracks. Inspect them before every trip and replace nicked or loosened ties immediately before loading up.
Confirm Panel Holds 40 Pounds
With the crates or supports locked together, test the finished panel with at least 40 pounds before your dog uses it. Use a bag of sand, bottled water, or other compact weight, placed first in the center and then near each edge.
Watch for bending, cracking, loose zip ties, compressed foam, or a gap opening between the panel and rear seat. Check that the load rests on the vehicle floor, not on upholstery, seatbelt webbing, or a single strap. Recheck fasteners after five minutes under weight. Make sure front seats still move normally and that you haven’t covered buckle receivers, LATCH anchors, or airbag-related trim. If anything flexes or shifts, reinforce the weak area with a wider base, thicker board, or additional floor-supported block.
Fix Platform Sliding Under Braking
A platform that shifts under braking can send your dog forward and interfere with seat hardware, so correct movement before driving. Park on level ground, press the platform forward and sideways, and identify the travel path. Add a nonslip rubber mat beneath it, then fit floor supported foam or wedges tightly to the footwell.
| Check | Corrective action |
|---|---|
| Front edge | Brace against seat base |
| Center hump | Cut a clearance notch |
| Bottom surface | Use grippy rubber mat |
| Seat hardware | Keep anchors unobstructed |
Don’t trap seat belt buckles, LATCH anchors, wiring, or front seat rails. Recheck clearance after moving either front seat. Load platform with your dog’s weight, brake gently in a lot, and stop using it if it tilts, creeps, or contacts hardware during hard stops.
Inspect Zip Ties Monthly
Inspect every zip tie monthly, because heat, UV exposure, vibration, and your dog’s movement can make plastic ties brittle or loosen their hold.
Check for whitening, cracks, flattened locking heads, sharp cut ends, and straps that can shift. Replace any suspect tie immediately; don’t wait for it to break during a stop or turn. Use UV-resistant, automotive-grade ties sized for the load, but never let them serve as the platform’s only support.
Your filler should rest on the footwell floor, while ties only prevent movement. Keep ties clear of seatbelt buckles, LATCH anchors, wiring, seat tracks, airbags, and front-seat travel. After replacing them, push and pull the platform, then test it with your dog’s weight while parked. Recheck after trips, temperatures, chewing, or cleaning.
Conclusion
With a level, nonslip platform, you give your dog a steadier back-seat area while protecting your vehicle’s footwell. Measure carefully, secure every panel and crate, and test the setup with at least 40 pounds before driving. Keep seat belts, airbags, buckle access, and door latches unobstructed. If the platform shifts under braking, stop and improve its anchors. Check zip ties, mats, and plywood edges monthly, replacing worn parts before your dog rides in it again.
